Self-Drafted Pleated Tweed Skirt - Athína Skirt
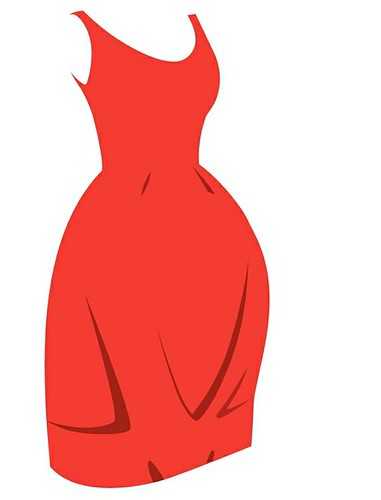
This is the sketch I made of a 1957 Hubert de Givenchy dress.
When I saw it I just loved the pleating and the unusual line. I loved it but it was not something I could make or wear. Then at an exhibition opening I saw a girl wearing a skirt that sort of reminded me of the Givenchy dress but upside down. I sketched it quickly (on the invite) and when I got home I redraw it and started wondering if I could make it. I had nothing to go on (besides the sketch) so I figured I should read a book.
After an extensive search on amazon I decided to buy Patternmaking for Fashion Design by Helen Joseph Armstrong. It was kinda pricey but it was a fifth edition (so it must be good), it had glowing reviews (I decided to ignore the one about it not being for beginners…), and the magic word “design” in the title.
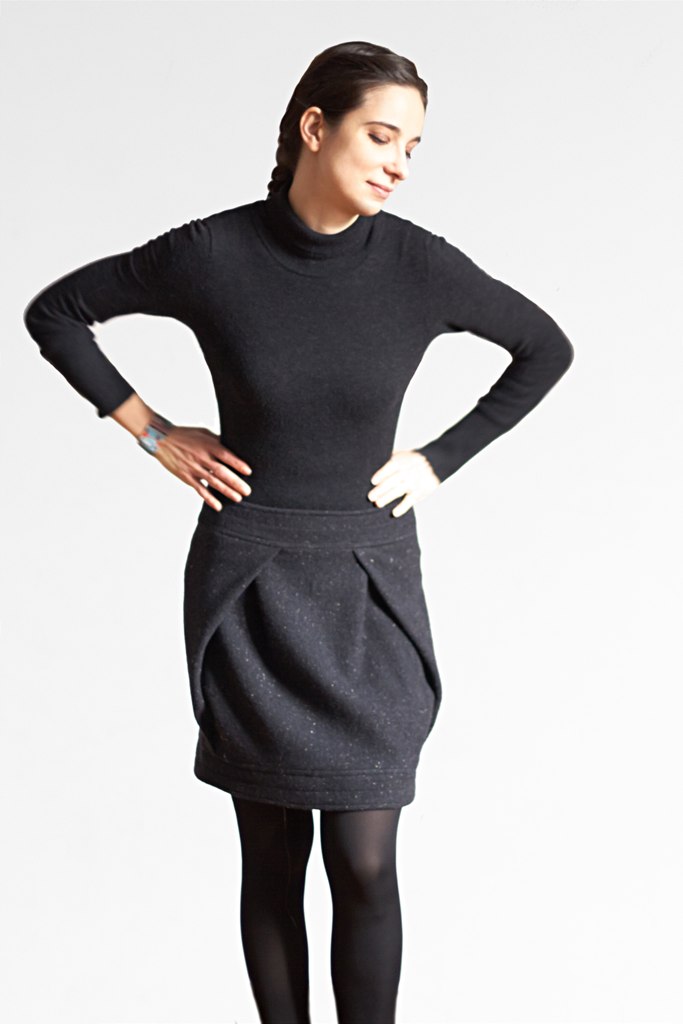
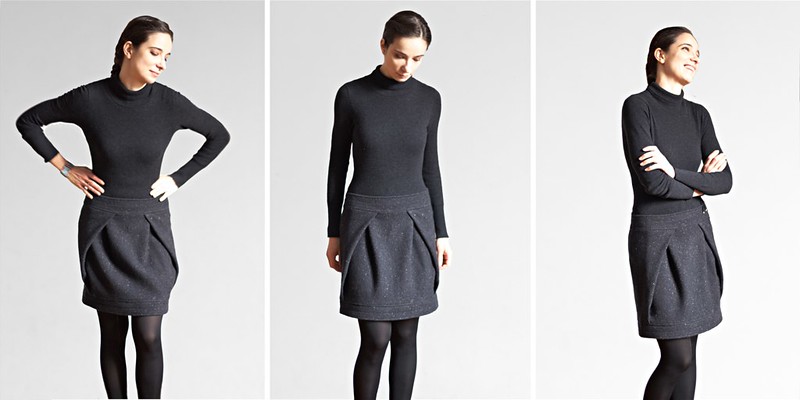
It took me a month to learn how to draft a basic skirt sloper, how to adjust the sloper to fit my my measurements and how to modify it to fit my drawing. It took me some more to figure out on my own how to sew it, to make a muslin and to actually make it. But here it is... one could never imagine by seeing it that in my mind all started with a Givenchy dress!
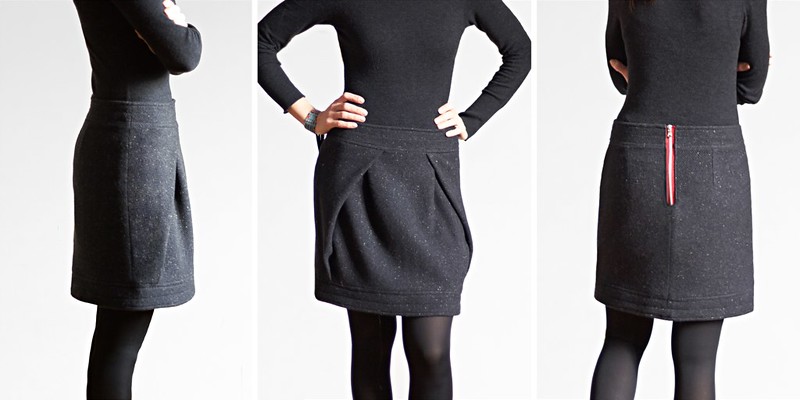
I chose a black 100% wool plain loose twill tweed. It is quite thick although not as thick as the fabric I used for the Zoe dress but still pretty difficult to sew (with the pleats, the facings, the interfacings at the belt and hem and all) on my lowish end sewing machine. Add to that my inexperience and you get some outright wonky seams :-( !!!
I liked the idea of an "accent" zipper so I went for it…. maybe it's too much?
By now I think you all realised that this didn’t happen last week. There was little bit of a time lag between me doing things and me posting them (essentially due to the fact that blogging was sort of an afterthought … I had this idea that if I blabber about it I’m more likely to succeed in my “endeavours” ) - but with this post I finally caught up. I realise this is, again, a cold weather skirt and now it’s spring … but lets call it fall-winter 2014 “collection” :-).
If you want to play with it you can download the pattern I made for myself. //available until April 10th//
Let me know whatcha thinking … I’d be happy to hear your thoughts.
Thank you for visiting. I love getting comments and always visit links when available.
When I saw it I just loved the pleating and the unusual line. I loved it but it was not something I could make or wear. Then at an exhibition opening I saw a girl wearing a skirt that sort of reminded me of the Givenchy dress but upside down. I sketched it quickly (on the invite) and when I got home I redraw it and started wondering if I could make it. I had nothing to go on (besides the sketch) so I figured I should read a book.
After an extensive search on amazon I decided to buy Patternmaking for Fashion Design by Helen Joseph Armstrong. It was kinda pricey but it was a fifth edition (so it must be good), it had glowing reviews (I decided to ignore the one about it not being for beginners…), and the magic word “design” in the title.
It took me a month to learn how to draft a basic skirt sloper, how to adjust the sloper to fit my my measurements and how to modify it to fit my drawing. It took me some more to figure out on my own how to sew it, to make a muslin and to actually make it. But here it is... one could never imagine by seeing it that in my mind all started with a Givenchy dress!
Let me know whatcha thinking … I’d be happy to hear your thoughts.
Gonna in Tweed da Progetto Personale - Gonna Athína

Questa é un'illustrazione di un vestito del 1957 di Hubert de Givenchy.
Vedendo il vestito mi sono innamorata della sua linea particolare modellata con l'aiuto della plissetattura e l'ho disegnato. Non era però un vestito che io avrei potuto ne cucire ne indossare. Poi, all'inaugurazione di una mostra, ho visto una ragazza indossare una gonna che ricordava una sorta di vestito Givenchy a testa in giù. L'ho disegnata velocemente (sull'invito) e una volta arrivata a casa ho cominciato a chiedermi se magari non sarei riuscita a fare una gonna simile. Purtroppo tutto quello che avevo era una bozza frettolosa e nient'altro ... Solitamente quando non so qualcosa, tendo ad aprire un libro, dunque mi toccava trovare il libro giusto da aprire.
Dopo un'ampia ricerca nelle librerie online ho deciso di comprare Patternmaking for Fashion Design di Helen Joseph Armstrong. Libro abbastanza costoso (in inglese :(...) ma una quinta edizione (perciò per forza un buon libro), aveva delle recensioni stellari e la parola magica "design" nel titolo.
Mi ci è voluto un mesetto per imparare a modellare una gonna base, adeguare le misure alle mie e modificarla in base al mio disegno. Mi ci è voluto un altro po' per capire come dovevo procedere a cucire, fare la tela di prova e poi cucire effettivamente la gonna. Ma eccola... ed a vederla non ci penseresti mai che sono partita da un vestito Givenchy!
Ho scelto un tweed nero a saia semplice e trama larga in lana 100%. É abbastanza spesso, non come il tessuto che ho usato per il vestito Zoe, ma comunque spesso abbastanza per provocare (tra pieghe, rivestimenti e rinforzi termoadesivi alla cintura e all'orlo) una crisi di nervi nella mia piccola, amatoriale machina da cucire. Mescola tutto questo con la mia inesperienza e ottieni delle cuciture ubriache !!!
Mi piaceva l'idea di una zip "accento" perciò l'ho messa ... forse è un po' troppo? Boh...
Penso abbiate già capito che tutto ciò non è successo la scorsa settimana. C'è stata una piccola differenza per quel che riguarda le tempistiche: tra fare e postare (dovuta essenzialmente al fatto che il blogging è arrivato in un secondo tempo - ho pensato che mettermi a blaterare pubblicamente sarebbe una sorta di incentivo) - ma con questo post le due cose si sono congiunte. Mi rendo conto perciò che vi sto presentando una gonna per la stagione fredda alle porte della primavera ... chiamiamola "collezione" autunno-inverno 2014 :-) .
Se vi volete divertire e giocarci potete scaricare il cartamodello che ho disegnato per me stessa. //disponibile fino al 10 Aprile//
Sarei molto contenta di sapere cosa ne pensate.
Grazie della visita. Adoro ricevere commenti e visito sempre i link quando ci sono.
Vedendo il vestito mi sono innamorata della sua linea particolare modellata con l'aiuto della plissetattura e l'ho disegnato. Non era però un vestito che io avrei potuto ne cucire ne indossare. Poi, all'inaugurazione di una mostra, ho visto una ragazza indossare una gonna che ricordava una sorta di vestito Givenchy a testa in giù. L'ho disegnata velocemente (sull'invito) e una volta arrivata a casa ho cominciato a chiedermi se magari non sarei riuscita a fare una gonna simile. Purtroppo tutto quello che avevo era una bozza frettolosa e nient'altro ... Solitamente quando non so qualcosa, tendo ad aprire un libro, dunque mi toccava trovare il libro giusto da aprire.
Dopo un'ampia ricerca nelle librerie online ho deciso di comprare Patternmaking for Fashion Design di Helen Joseph Armstrong. Libro abbastanza costoso (in inglese :(...) ma una quinta edizione (perciò per forza un buon libro), aveva delle recensioni stellari e la parola magica "design" nel titolo.
Mi ci è voluto un mesetto per imparare a modellare una gonna base, adeguare le misure alle mie e modificarla in base al mio disegno. Mi ci è voluto un altro po' per capire come dovevo procedere a cucire, fare la tela di prova e poi cucire effettivamente la gonna. Ma eccola... ed a vederla non ci penseresti mai che sono partita da un vestito Givenchy!
Sarei molto contenta di sapere cosa ne pensate.


Ohhhhh! This skirt is STUNNING!! Fantastic job! I downloaded it and I'll see if I am able to make it! I just went to amazon to view the book and it looked familiar for me. Then I remembered a few weeks ago I was in an second hand store and picked up a pattern drafting book. It is the exact book except it is the 4th edition! I never really took a good look through it but I think I'm going to start studying now!
ReplyDeleteThank you so much!!!.... In my opinion Armstrong's book is very good and quite technical (just how I like them) ... The pattern (keep in mind is my first one) is in my size I hope you manage to modify it to your measurements ... Hope you'll keep me posted :)
ReplyDeletePer me e' bellissima !! Mi piace pure il colore e la zip! Blaterare fa bene e' liberatorio e io da quando blatero nel blog mi sento più leggera!! Il cartamodello me lo conservo.. Vedi mai che decido di imparere a cucire! Per il prossimo inverno ce l'ho! Baciiii
ReplyDeleteI saw this on Kollabora and love it- it's just the thing I need for a gorgeous piece of moss trees wool I have. Thank you for generously offering the pattern!
ReplyDeleteGrazie Simo ... ho usato la parola blaterare perché quando ho detto a mia ma' che intendo pubblicare un blog, guardandomi un po così mi ha detto "cioè intendi blaterare su internet?".....Spero tu ti decida a imparare a cucire ... con la tua creatività ma sai quante cose potresti fare ...anche per la piccola?!
ReplyDeleteThank you ... I'm so glad you like it ... I hope you manage to modify it to fit your measurements ... keep me posted :-)!
ReplyDeleteHi Sasha. you did a great job. could you please let me know what software are you using drafting this pattern. thanks for sharing. great photos and beautiful styling. love it.
ReplyDeleteHi Ada first of all thank you for your kind words ... If you read my other posts you know I am an artist/painter/illustrator by trade so I drew the hole thing on paper using what I learned from the book and then digitized it in Illustrator ... Saw some pics on the net to learn how to mark it ( notches, writings ...) it was kinda fun. I love doing apparently useless things. BTW your patterns are really beautiful ... What do you use?
ReplyDeleteSasha, that is amazing, A lot of work, I can only imagine! .Because I , myself, did try that before. But I guess I needed more tutorials and patience about digitizing. I thought I needed that professional digitizer which I don't have.. Right now I am using a CAD system that is designed for pattern draft, it is in Chinese, not very commonly known in the English community. But I do the editing afterwards using Illustrator. it is a great tool, waiting to see your new designs.
ReplyDeleteThis dress looks stunning on you! Congrats :) Love it :)
ReplyDeleteI could never make anything in 2 hours - well, maybe small leggings for my daughter and a super simple A line dress. But those are tiny things. 2 hours to pick fabric - maybe ;)
ReplyDeleteThank you Jenya !
ReplyDeleteI feel better then :-)
ReplyDeleteJust researched CAD systems for patternmaking ... wow they are so complicated, so professional, sooooo expensive... I think I'll stick to the pencil for now :)
ReplyDeleteThis is lovely, I saw it over on Burdstyle and had to comment. Drafting your own stuff is the best! I'm keen to check out the book you mentioned, I'm a big fan of the Winifred Aldrich books but it's good to add to my book collection.
ReplyDeleteThank you, and thank you for commenting ... I
ReplyDeleteI really like your pattern and it was very kind of you to offer it! I wonder whether you could you please explain something more about how it should be printed (the pdf file opens in 1 A4 page- so I guess I should print it on a scale for a real size print- what would this be?). Thank you!
ReplyDeleteFirst of all, thank you for visiting and I'm really really happy you like it :). The size of the pattern is in fact around 70 x 78 cm. If it prints out as an a4 is because you must have the fit to page option selected. To print it correctly from Adobe Reader you must use one of the latest versions (you can get it free at: http://get.adobe.com/reader/ ) and select the Poster printing option. Below I included a screenshot of the printing options. Make sure tile scale is set to 100% and select cut marks and labels to help with assembling (done the same way as with any other digital pattern) Check the size of the test square on the print out. It should be 10 x 10 cm. (roughly 4 x 4 in). Alternatively you can print it at a print shop. Hope this explains it. Let me know how it goes :-)
ReplyDeleteThanks for the reply- I would like to try this pattern soon- I'll let you know how it goes!
ReplyDeleteHi Sasha- I have altered the pattern to my measurements and today I cut the fabric. Could you please give us an outline of the construction process (I have in mind just an order of construction steps)? I am not so experienced in sewing and I need some help in putting it all together.
ReplyDeleteBeautiful! I love the zipper colour - a nice surprise.
ReplyDeleteHi Eirene,
ReplyDeleteEmbarking upon such a task with limited knowledge is quite courageous of you! A lady after my own heart! I do not know what fabric you decided to use so I will explain what I did for my wool tweed fabric. Bear in mind that I am not a professional pattern-maker and a beginner seamstress. I would recommend you to sew a muslin first. I did.
Because it is not lined and the tweed frayed I overlocked: the side edges, the edges of the back seam, the bottom edge of the facings taking care not to stretch it out of shape. To give it structure and rigidity I used fusible interfacing at the waistband and hem. I also used it at the back around the the back seam to compensate for the difference in rigidity between the fabric and the zipper. Depending on the fabric you chose you might or might not have to do the above.
1- Close the pleats (one is a inverted CW knife pleat, the other one a normal CW knife pleat) pin and baste them to the edges.
2 - Pin back darts and stitch ending in a narrow tip. Tie the thread. Iron darts towards the middle.
3 - Place front waistband onto the front piece right sides together. Pin and stitch front waistband to front piece. Open and iron seam allowances towards the waistband. Same for back.
4 - Place back pieces onto the front piece right sides together. Pin and stitch side seams. Fold apart and iron.
5 - Place hem facing over the hem piece, right sides together. Stitch the bottom hem seam. Open and iron seam allowances towards hem.
6 - Place this new piece on over the skirt piece right sides together. Pin and stitch the seam between skirt and hem. Open and iron seam allowances towards the hem piece.
7 - Place back waistband facings over the front waistband facing, right sides together. Pin and stitch at the sides. Fold apart and iron.
8 - Place waistband facing over skirt piece, right sides together, side seams should be on top of each other. Pin and stitch. Open and iron seam allowances towards waistband. Fold the facing towards skirt and iron.
The zipper part is the tricky one. Depends very much on the zipper you use, on its width and on the method you chose to insert it. I hope you considered it all when redrafting the pattern. If you did you should have no problems as the zipper should fit the dedicated opening allowing you enough space to….
9 - …roll towards the inside the edge of the fabric at the zipper and baste it creating a smooth curved opening. If you didn’t you might have to modify the back seam a little to accomodate the zipper. I recommend you to baste everything and verify the fit and all.
10 - Fold the skirt in two, right sides together. Pin and stitch the back seam. Fold apart and iron.
Because I intended this skirt to be suitable for cold weather the zipper was not supposed to be in contact with the skin so I did not use any kind on lining underneath it. I just …
11 - …topstitched the zipper opening to the zipper after basting by hand in place. I used an invisible hand stitch to secure the zipper tape to the skirt hiding the fabric edges underneath. Stitched by hand the edges of the waistband facing to the zipper tape sandwiching the upper part of the zipper between the waistband and the waistband facing.
12 - Fold towards the inside the hem facing and iron.
13 - Topstitch the hem facing to the hem catching the seam allowances in the seam.
14 - Topstitch the the waistband facing to the waistband catching the seam allowances in the seam.
OMG i wrote a tutorial as a comment reply!!! The hubris and the enthusiasm of the beginner :-)
Even if it's on the inside and you can't really see it I just loved the idea ;-)
ReplyDeleteThe skirt looks really sophistocated. I love it! Well done figuring it all out from a book.
ReplyDeleteThank you! I'm glad you do.
ReplyDeleteDear Sasha, thank you so much for outlining the process of the skirt construction for me! This was a generous reply to my asking! I'll give it a try as soon as possible!
ReplyDeleteHi Sasha, I made a wearable muslin of your pleated skirt- it turned out longer and bigger than I intended but I love it! I will sure make it again for spring/summer. I cannot upload the pictures but you can see it here: https://www.flickr.com/photos/87934385@N07/13781053564/in/photostream/
ReplyDeleteAgain thanks for the pattern and the instructions!
Hi! Eirene... WOW I'm speechless ...and such an inspired styling! ...know what, because "self drafted pleated tweed skirt" is not really a name I decided to call it the "Athena Skirt" :-) . Hope to see you again on my blog, having readers like you makes it worth the effort!
ReplyDeleteKisses, Sasha
Grazie Annie! Il tuo blog e molto molto bello come anche le tue creazioni! ... ed il tuo italiano direi che è eccellente a differenza del mio francese ;-) !!!
ReplyDeleteMy size is 20, can you tell how to enlarge the cut to make it fit for me?
ReplyDeleteHi Marta ... sorry it took so long to get back to you... I've been trying to find a solution to your problem! Simply enlarging it when printing might not be good for you because it will scale up the pleats too and I do not know how that will look. The only thing that I can recommend you at this point is to try to frankenpattern this to your favorite pencil skirt ... after all it is a pencil skirt base. Alternatively as my skills in pattern-drafting are growing I will try to learn how to grade patterns too ... and I will grade all my self drafted patterns ... you could keep an eye on my blog... sooner or later I intend to grade this one too! Thank you again for visiting!
DeleteDear Sasha,
ReplyDeleteI love your skirt, and we happen to have the same size. I'd love make it, but unfortunately the link doesn't work anymore. Any chance you could upload it again? Thank you in advance
Hi Viri I'm sorry you did not leave an email address - I have no means of contacting you!
Deletep.s. glad you like my skirt :)
Hi Sasha, is there any way you could send this pattern to my mail? I really liked it and what you did with it!
ReplyDeletethanks a lot,
Ines
queimapestana@gmail.com
hello i love your Skirt. i want your Skirt Pattern.
ReplyDeleteplease upload skirt pattern .Once again.
Hi Midori! I'm sorry I cannot but you can leave an email address and I'll get back to you :)
DeleteJust found out your blog!! You really make awesome clothes!!!
ReplyDeleteI hope you will update that pattern soon, I'm more than willing to make it ;)
thanks
xoxo
hi Lien ... I am really glad you like my skirt and I'm really sorry I had not the time to update/improve/other stuff the pattern - maybe one day (keep in touch) - in the meanwhile if you want to try the pattern as is - if you think it would fit you (you can find my meas. in the about page) I can email it to you - just leave you address :)
DeleteThanks for your response!!
DeleteOnly my waist is bigger than yours, the rest will fit.
Maybe I can try to change it so it will fit for me.
Can you send the pattern via xcocolienx@hotmail.be?
Thanks a lot!!
xx
Hey Lien! Could you please send me your wonderful skirt pattern? It would be great to sew it for me! Thanks a lot!
ReplyDeletemona.doemling@gmx.de
I have been looking everywhere for a skirt pattern like this! Its stunning. If you still have the pattern, id realy appreciate it if you could forward it to me... its even my size. Kind regards. Nay.
ReplyDeleteNay.louise24@gmail.com
It is the intriguing combination of colors and structures that adds the excitement to designs. boucle fabrics
ReplyDeleteHi! Beautiful. Could I also get the pattern please?
ReplyDeleteEmmanuellenaud@gmail.com
Thanks!
Emma