

Adventures in Dartless (2) - Linen
The main problem with the dartless bodice basic block, as outlined in Il Modellismo Sartoriale is that it “…causes the front of the armhole to gape. The amount of the gape depends on the depth of the bust”.
In my previous project based on this block, trying to remedy I ended up overfitting slightly. This time I thought to follow the advice given in the book : “apply to the armhole edge a bias strip which is slightly shorter than the measurement of the entire armhole”. I redrafted the whole thing keeping a reasonable ease at the bust and made some style changes to go with the bias binding. I learned how to make my own bias binding, I wanted it in the same fabric and made it wider than the standard ones - a choice dictated by aesthetics which made a bit more difficult the sewing it on part. I had to really stretch the edge at the seam to compensate for the extra width. Between the stretch to compensate for this and stretch to compensate for that, the whole thing started to be quite complicated and to simplify I decided to use a version of the method used for setting in sleeves. After stay stitching the front neckline and the armholes I made a couple of rows of ease stitches going from the middle of the front armhole to the underarm and using these rows I “eased” the armhole into the bias binding.
To my surprise it kinda worked.
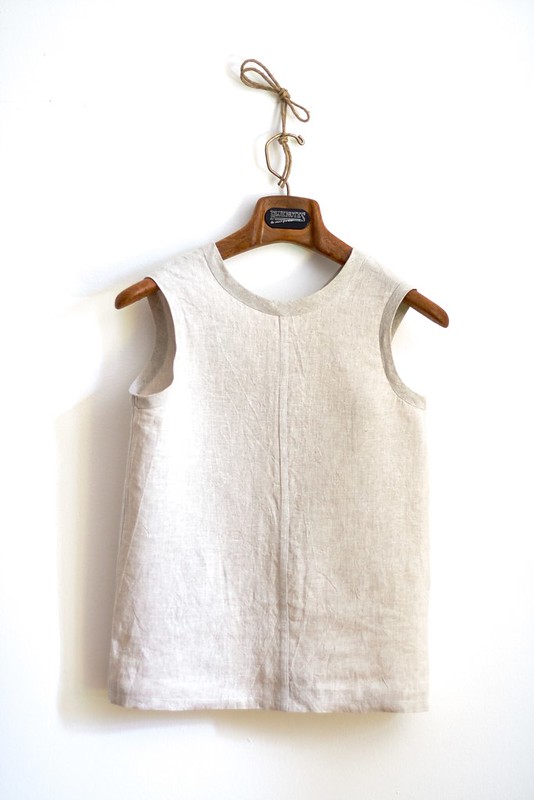
 As in Italy summers can be quite hot I like a lot to wear linen. I have several meters of 30cm wide strips of raw linen (long story…) and to be able to use it I’ll have to get creative. In this case I decided to join two pieces together using a flat-felled seam.

 In case you might wonder I do own a pressing iron… the pieces of linen I used were “ruined” by some thermal machine process and the creases cannot be eliminated - but then that’s what I liked about it.

 It is light and comfortable and casual … and I am pretty pleased with it.
 For now, no download for this … I want to fiddle with it some more and try and learn to grade it - I’m thinking from a size 40 to a 48 but will see :-).
Thank you for visiting. I would love to hear your opinion.
Avventure Senza Riprese (2) - Lino
Il problema più grande del corpetto semplice senza riprese, così come schematizzato nel libro Il Modellismo Sartoriale è che “…nella posizione dell’incavo davanti, provoca un molleggio del tessuto a causa della sporgenza seno”.
Nel mio precedente progetto basato su questo tipo di corpetto, nel provare a ovviare a tale difetto sono finita col farlo un po troppo aderente attorno al busto. Questa volta ho pensato di seguire il consiglio nel libro: “applicare un bindello teso nella parte del molleggio dell’incavo davanti”. Ho ridisegnato il tutto, tenendomi ragionevolmente larga attorno al busto e ho fatto qualche cambiamento di stile per farci andare il nastro sbieco. Ho imparato come fare il nastro sbieco - lo volevo nello stesso tessuto e un po più largo rispetto alle misure standard - una scelta dettata dall’estetica che però ha complicato molto la parte del montaggio. Ho dovuto tirare più del normale il bordo di cucitura per compensare la larghezza del nastro. Tira di qua, tira di la, le cose cominciavano a diventare macchinose e per semplificare ho pensato di usare una versione del metodo normalmente impiegato per il montaggio delle maniche. Dopo aver fatto una riga di cucitura attorno ai bordi del collo e delle maniche per stabilizzare le curve, ho eseguito due filze parallele dalla metà dell’incavo davanti fino all’ascella, ridotto e cucito il nastro sbieco.
Sorprendentemente sembra funzionare.
Adoro il lino, lo trovo molto adatto per il caldo estivo. Ho alcuni metri di lino grezzo a strisce 30cm larghe (lunga storia…) e per poterlo usare dovrò diventare creativa. In questo caso ho usato una cucitura ribattuta per unire due pezzi insieme.
Se per caso vi state chiedendo, ho un ferro da stiro e lo so anche usare… i pezzi di lino che ho tagliato sono stati “rovinati” attraverso qualche procedimento termico a macchina e le increspature no possono essere eliminate - per dire il vero mi piacciono, sono il motivo per il quale li ho scelti.
E’ leggero, confortevole e casual … e sono piuttosto contenta di come è venuto
Per adesso nessun download … voglio fare ancora delle piccole modifiche al cartamodello e poi provare ad imparare a progettarlo in altre taglie - forse da 40 a 48 … vedrò :-).
Grazie della visita. Mi piacerebbe moltissimo sentire la vostra opinione.
good job. again, great pictures.
ReplyDeleteso, it really means the gape is smaller for people who have smaller breasts. I personally like to have smaller ones which I do. I need to have tops with sleeves, I wonder in this book what kind of styles they have...kimono sleeves?
Thank you Ada! Indeed the gape is smaller for people with a smaller bust difference (chest circ. - bust circ) / 2- mine is 2. I like sleeveless tops ... they emphasise my shoulders balancing a otherwise pear shaped figure. In the book are included many styles ... kimono sleeves too with a construction based on the same simple dartless bodice I used.
Deletereally love the crease me too.. it looks so so beautiful on you.
ReplyDeleteSo beautiful! The rumpled texture of the linen coupled wiith those architectural lines give it a very refined quality. Impressive!
DeleteThank you Sara! I'm glad you like it :-)
DeleteWow this version of the top looks great! I love how the flat felled seam adds detail to the front :-)
ReplyDeleteThank you Jennifer! If I had to have a seam there ... better make it a really obvious one;-)
DeleteSe questo è quel che riesci a fare da autodidatta, tremo al pensiero di quel che sapresti fare con l'insegnamento di qualche sarta :) Originale il modo in cui hai fatto teminare ai lati del collo lo sbieco dello scollo davanti. Davvero brava!
ReplyDeleteGrazie Elisabetta.... troppo gentile :) ... La mia "originalià" penso nasca dalla mancanza dell'"ingombro" del sapere ;-)
Deleteperfect little blouse! and i really like the texture of that linnen fabric you used
ReplyDeleteThank you!!! Coming from an experienced sewing artist like yourself, means a lot :)
DeleteIl lino... Lo adoro!! Stropicciato???? Meglio!!! Mi piace la scollatura dietro .. A leggere i tuoi post mi viene voglia di venire a casa tua a cucire insieme a te!!!! Calcola che sto cominciando a guardare macchine per cucire.. Se la compro diico a mio marito che è' colpa tua!! Un caro saluto Simo
ReplyDeletesiiiiiiiiiiii..... ho un sorriso che va da un orecchio all'altro ... ancora un po' e fa il giro :-))))
DeleteBaci Baci Baci!
Love this!
ReplyDeleteBravissima! Mi piace moltissimo come cuci. Ha una mano sapiente e genio creativo! Caspita che invidia, sana ovviamente... :-))
ReplyDeleteohhhh ☺ ... grazie del bellissimo complimento !!!
DeleteHello! I absolutely love this linen top, and I'd love to try making it. Have you figured out a pattern for it...? Or can you suggest a similar pattern? Thank you so much! --Anacelie
ReplyDeleteThis is my perfect linen top. It's just flawless. please, oh please, can you publish a pattern for this?
ReplyDeleteSame comment as above - I also have some linen pieces of fabric I'd like to use to make a top and love this design! Any chance you might share or suggest a pattern?
ReplyDelete